This article will guide you through the process of growing pinto beans from seed. It starts with selecting a variety that is appropriate for your climate, moves on to planting and watering, then covers harvesting and storage. The article concludes with some tips for how to get the best yield from your harvest.
First, let’s cover what type of soil you need to grow pinto beans plants successfully: They thrive in sandy loam soils that are slightly acidic (pH 6-7). Soil that is too alkaline or clayey will produce poor results.
BEFORE PLANTING: Prepare
The Soil
If you are starting your pinto beans seeds indoors, start by preparing the soil in the pots. Fill each pot with a mixture of peat and vermiculite or perlite to a depth of 3-4 inches.
Drainage is most important for this seedling mix; make sure that water does not pool around the base of your plants’ roots when they are placed in larger containers later on.
Prepare The Bed Space For Planting
The next step is to prepare space for direct sowing once the last frost has passed and your pinto beans have sprouted:
Till up the ground using a shovel or rototiller, mix compost and fertilizer to achieve an even depth throughout your planting area. (For a more detailed guide, check out this page on preparing a seedbed for planting.)
Plant Your Beans
If you are starting your pinto beans seeds indoors, transfer them to larger pots once germinated. Space each seedling about one foot apart in rows that are at least 18-24 inches apart to give the plants room to grow.
To harden them off before transplanting outdoors, place the pots outside during the day and bring them back inside at night for several days; some varieties can be planted directly into their final raised bed location after 3-4 days of this treatment.
After all danger of frost has passed, plant every bean seed in its own hole with 1/2 inch of soil covering the seeds. (For a more detailed guide, check out this page on planting beans.
Water Your Beans
The specific watering requirements for pinto beans will depend on your region and whether or not you are growing them in containers. Regardless of where you plant your seedlings, you want to water thoroughly (to a depth of 3-4 inches) every one to two days during dry periods (such as time spent indoors), becoming less frequent once the plants have passed their first few weeks outside.
Once the roots reach deeper soil layers, they become less sensitive to changes in weather conditions.
Note that over-watering is more likely to cause problems than underwatering: leave at least 1 inch between the soil’s surface and the rim of the pot. (For more information, check out this article on watering beans.
Protect Your Plants From Pests And Disease
To help prevent pests and disease from damaging your pinto beans plants, you can apply a layer of mulch around their base to keep weeds down and moisture in the soil; it also contributes to deeper roots that are less likely to be harmed by larger insects.
Don’t spread compost directly onto the surface of leaves or stems, as some composter ingredients have been shown to harm bean plants (notably tobacco). Before using compost tea or manure teas (which are especially prone to introducing harmful pathogens), mix them with water at half strength before watering your plants. Overall, prevention is best;
water carefully, make sure that your soil is rich in nutrients and healthy, and if you do have to fight off pests or disease, use a natural solution.
POTENTIAL PROBLEMS AND SOLUTIONS:
White Mold: If moldy white splotches appear on the leaves of your pinto beans plants, don’t worry; this is not a sign that they are diseased, but rather an indication that it is time to water more often. (Thanks for comments from Mike at Tuttlebee’s! )
Gray Mold:
White mold is relatively harmless; if gray mold appears instead, pluck off affected branches and avoid overwatering.
Sooty Mold: This mildew-like condition will appear on plants growing in containers or too humid areas. You can spray affected leaves with a mixture of 1 part milk and 3 parts water to remedy the problem; also, move your pinto beans plant to an area with better drainage and sun exposure.
Leafhoppers: Planting marigolds around your bean plants will deter these small insects, as well as other types of pests like aphids and slugs.
Aphids:
These tiny critters may be troublesome if they find their way indoors, but you can wipe them off by hand once they have been detected.
Beans: If you are unsure what type of bean seedlings sprouted from your seeds, look for clues on the pod itself – most common garden beans grow on purple or green pods.
If the plants are not producing any pods, they may not be fertilized enough; check your soil to ensure that it contains a mix of sand, loam, and clay to supply the nutrients needed by this crop. (A lack of nitrogen is especially likely to cause pod production problems.
Seed Size:
Beans naturally vary in size considerably for reasons including weather conditions and genetics – you can harvest them at whatever size you prefer, but note that beans grown for their edible seeds should have an immature weight of around 0.5 oz per pound (roughly 100 grams.
Leaf Color: To produce dark-leafed varieties such as ‘Black Valentine,’ buy seeds from those labeled “Black Valentine Suttons.” For green varieties like ‘Kentucky Wonder,’ make sure the seeds are specifically labeled as such.
Uneven Growth:
Irregular plant growth is likely due to uneven soil moisture uptake, fluctuating temperatures, or insufficient sunlight – depending on your growing conditions, one of these solutions may be more effective than another.
White Mold:
If moldy white splotches appear on the leaves of your pinto beans plants, don’t worry; this is not a sign that they are diseased, but rather an indication that it is time to water more often. Overwatering can lead to root rot and other problems, but if it has simply been a few days since your last watering, be sure to give the soil a good soak.
Also, keep in mind that beans are drought-resistant and therefore unlikely to need regular irrigation unless you live in an area of scorching temperatures or sandy soils.
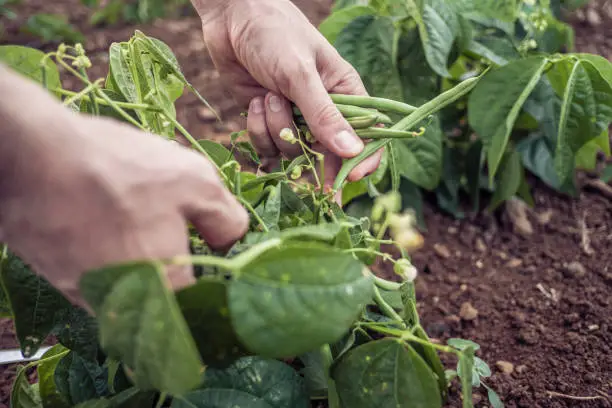
Harvest and Storage:
Pick pinto beans when they are still small and firm, as larger pods tend to become tough. In general, harvest them before the tips of the pods begin to turn brown, although if you prefer a milder taste, you can take some into your kitchen with slightly darker coloring.
After picking the pods off their stalks, store them in cardboard boxes or paper bags in a cool place; they will keep for several months this way. You should also remove any dead leaves that may be lying around on the crown of your plants at this time.
If you have surplus beans (you can easily grow more than one plant), remove fully-grown seeds from their pods and store them in an airtight container until planting season next year.
It is important to note that although pinto beans are one of the plants from which edible seeds are harvested, their leaves can also be eaten and are used in Latin American cuisine.
Also, if your pinto bean plant has been grown as an ornamental and it happens to produce fruit in a place where you don’t want pods or flowers (such as on your front lawn), pick them off before they begin to turn brown and throw them away.
Another option is to paint with water any areas that you do not want to be pollinated; white paint works best for this purpose.
If the growing season ends before the beans have matured fully enough for harvesting, put a piece of clear glass over each stem until harvest time; this will protect them from sun scalding. They will then be ready for presentation in your kitchen.
Seed saving: Pinto beans produce both pollen and seeds that self-pollinate; their flowers are wind-pollinated, however. Therefore if you remove one of the two possibilities (the wind or the self), they will not reproduce – plant one normal pinto bean plant and another at least ten feet away in an area where bees cannot reach it, such as behind a fence or wall.
Beans Nearby? These plants tend to cross-pollinate easily even when growing very far apart due to a phenomenon known as “infrasound”; know that if you really want pure seed varieties, you must